How To Remove Kitchen Cabinet Drawers?
Kitchen cabinets are a staple in every household and are often used to store essentials and utensils. However, over time, the drawers inside these cabinets may become damaged or require replacement. Removing these drawers may seem like a daunting task, but with the right tools and approach, it can be a simple and straightforward process.
Before you begin, it’s essential to understand the type of drawer you have and the mechanism used to secure it. Some drawers may be held in place by screws, while others may have a release lever or slide mechanism. With the right knowledge and tools, you can easily remove your kitchen cabinet drawers and have them replaced or repaired in no time.
**How to Remove Kitchen Cabinet Drawers**
If you’re planning to renovate or update your kitchen, you may need to remove the cabinet drawers. Removing the drawers may seem like a daunting task, but with the right tools and steps, it can be done efficiently and safely. In this article, we’ll guide you through the process of removing kitchen cabinet drawers in 10 easy steps.
**Step 1: Check the Drawer Type**
Before removing the kitchen cabinet drawers, it’s important to know the type of drawer you’re working with. There are two types of drawers, namely, full-extension drawers and under-mount drawers. Full-extension drawers are the most common types of drawers found in kitchen cabinets. They are held in place by metal slides that are screwed into the cabinet frame. On the other hand, under-mount drawers are mounted on the sides of the cabinet and are held in place by brackets.
**Step 2: Empty the Drawers**
Before removing the kitchen cabinet drawers, ensure that they are empty. Remove all the contents of the drawers and place them in a safe place.
**Step 3: Remove the Drawer Fronts**
If you’re removing the entire cabinet, you may skip this step. However, if you’re only removing the drawers, you need to remove the drawer fronts first. To do this, locate the screws that hold the drawer front in place. Use a screwdriver to remove the screws and gently pull the drawer front away from the drawer box.
**Step 4: Remove the Drawer**
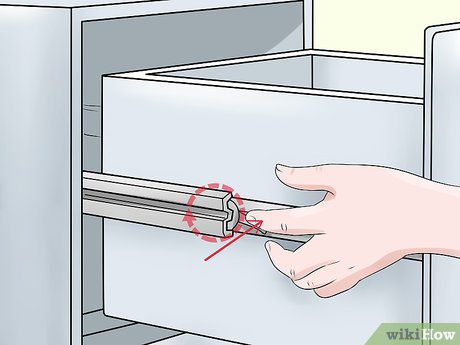
Once you’ve removed the drawer front, it’s time to remove the drawer. To do this, extend the drawer fully and lift it slightly. Look for the release lever or clip located on the sides of the drawer slides. Press the lever or clip and gently pull the drawer away from the cabinet.
**Step 5: Remove the Drawer Slides**
With the drawer removed, you can now remove the drawer slides. To do this, locate the screws that hold the slides in place. Use a screwdriver to remove the screws and gently pull the slides away from the cabinet.
**Step 6: Remove the Brackets**
If you’re working with under-mount drawers, you need to remove the brackets that hold the drawers in place. To do this, locate the screws that hold the brackets in place. Use a screwdriver to remove the screws and gently pull the brackets away from the cabinet.
**Step 7: Clean the Cabinet**
With the drawers removed, you can now clean the cabinet. Use a damp cloth to wipe down the interior of the cabinet.
**Step 8: Reinstall the Drawer Slides or Brackets**
If you’re reinstalling the drawers, you need to reinstall the drawer slides or brackets. To do this, align the slides or brackets with the holes in the cabinet and secure them in place with screws.
**Step 9: Reinstall the Drawer**
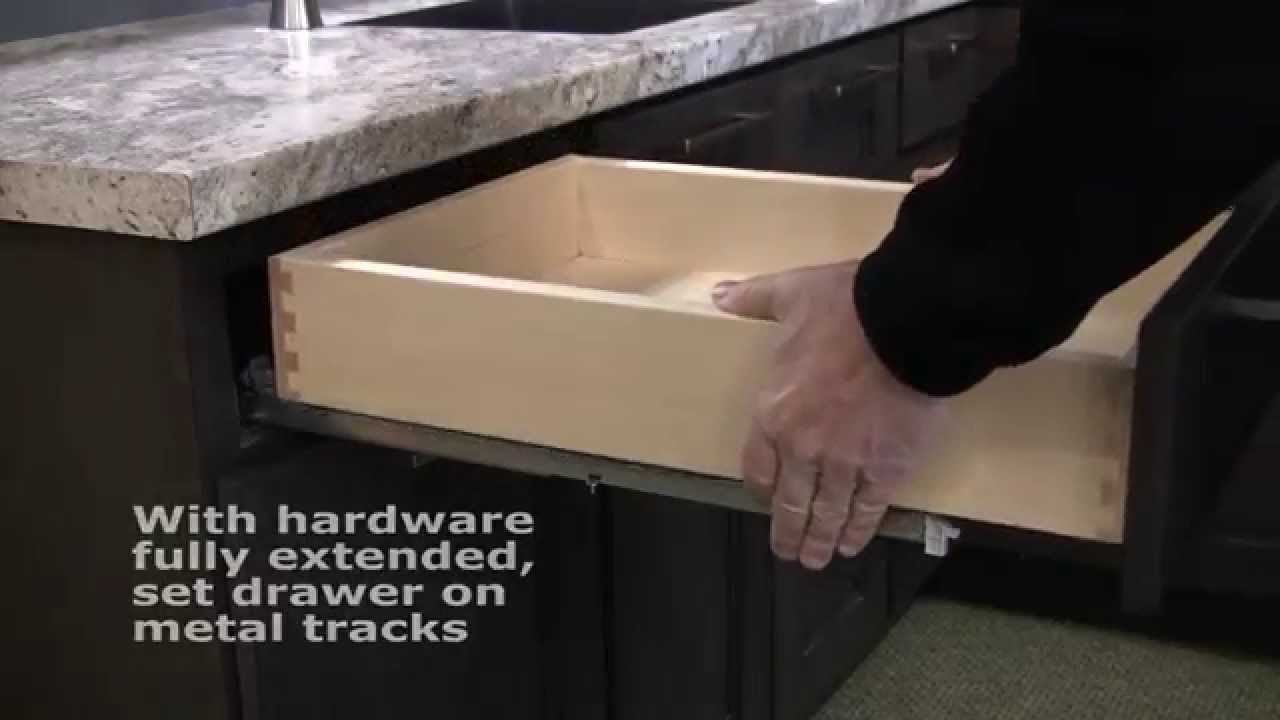
Once the slides or brackets are in place, it’s time to reinstall the drawers. To do this, align the drawer with the slides or brackets and push it in gently. Ensure that the drawer is aligned correctly and moves smoothly.
**Step 10: Reinstall the Drawer Fronts**
Finally, it’s time to reinstall the drawer fronts. To do this, align the drawer front with the drawer box and secure it in place with screws.
**Benefits of Removing Kitchen Cabinet Drawers**
Removing kitchen cabinet drawers may seem like a lot of work, but it has several benefits. Firstly, it allows you to clean the interior of the cabinet thoroughly. Secondly, it makes it easier to access hard-to-reach areas of the cabinet. Finally, it allows you to update or replace the drawers easily.
**Vs Full Cabinet Removal**
Removing kitchen cabinet drawers is a less invasive process compared to removing the entire cabinet. It’s less time-consuming and causes less damage to the cabinet.
In conclusion, removing kitchen cabinet drawers may seem like a challenging task, but with the right steps and tools, it can be done easily and safely. By following the steps outlined in this article, you’ll be able to remove the drawers efficiently and ensure that they’re reinstalled correctly.
Frequently Asked Questions
Here are some common questions and answers related to removing kitchen cabinet drawers.
What tools do I need to remove kitchen cabinet drawers?
To remove kitchen cabinet drawers, you will need a few tools. These include a screwdriver, pliers, a putty knife, and a drill. You may also need a hammer and a pry bar, depending on the type of drawer you are removing.
Before you begin, make sure you have all the necessary tools on hand. You don’t want to start the job only to realize you’re missing a crucial tool.
How do I remove the drawers from a standard framed cabinet?
To remove drawers from a standard framed cabinet, start by opening the drawer fully. Look for the metal tracks that the drawer slides on – they will be located on either side of the drawer. You should see a small lever or tab near the front of each track.
Press down on the lever or tab on one side of the drawer, then lift the drawer slightly and pull it towards you. Repeat the process on the other side of the drawer, and it should come right out.
How do I remove the drawers from a frameless cabinet?
The process for removing drawers from a frameless cabinet is a bit different than from a standard framed cabinet. Start by pulling the drawer out as far as it will go. Then, look for a small plastic clip or lever on the underside of the drawer.
Press down on the clip or lever and lift the drawer up slightly. Then pull the drawer towards you to remove it from the cabinet.
What should I do if the drawer is stuck and won’t come out?
If the drawer is stuck and won’t come out, don’t force it. Instead, try wiggling the drawer back and forth to loosen it. You can also try lifting the drawer slightly and then pulling it towards you.
If the drawer still won’t budge, you may need to remove the tracks from the cabinet to access the drawer from the bottom. Use a screwdriver to remove any screws holding the tracks in place, then remove the tracks and the drawer should come out easily.
How do I reinstall the drawers once I’ve removed them?
To reinstall the drawers, simply reverse the process you used to remove them. For framed cabinets, insert the drawer onto the tracks and push it all the way back. Then, push down on the levers or tabs to lock the drawer in place.
For frameless cabinets, lift the drawer up slightly and line up the plastic clips with the tracks. Then push the drawer back in until it clicks into place.
How To Remove Your Cabinet Drawers In 60 Seconds
In conclusion, removing kitchen cabinet drawers may seem like a daunting task, but with the right tools and techniques, it can be done quickly and easily. By following the steps outlined above, you can safely and efficiently remove your kitchen cabinet drawers without causing any damage to the cabinet or the drawer itself.
Remember to take your time and be patient as you work through the process. Rushing can lead to mistakes and accidents, so it’s important to stay focused and attentive throughout the process.
Ultimately, removing kitchen cabinet drawers is an essential skill for any homeowner or DIY enthusiast. With these tips and tricks, you can confidently tackle this task and enjoy a well-organized and functional kitchen for years to come. So go ahead and give it a try – you might be surprised at how easy it can be!