
Shenandoah Cabinets Installation Guide: Step-by-Step Instructions For A Stunning Kitchen
Are you ready to transform your kitchen into a stunning space? Look no further than Shenandoah Cabinets! With their high-quality materials and expert craftsmanship, these cabinets are the perfect addition to any home. But where do you start? This installation guide will provide you with step-by-step instructions that will make installing your cabinets a breeze. Say goodbye to the stress of home renovation and hello to the kitchen of your dreams!
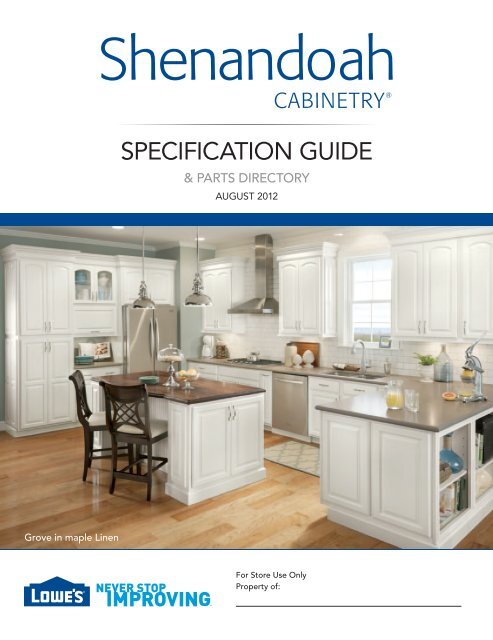
Shenandoah Cabinets Installation Guide: Step-by-Step Instructions for a Stunning Kitchen
If you are looking to spruce up your kitchen with some new cabinets, Shenandoah offers a wide variety of styles and finishes to choose from. However, installing cabinets can seem daunting, especially if you have never done it before. In this installation guide, we will walk you through the step-by-step process of installing your new Shenandoah cabinets to help you achieve a stunning kitchen.
Preparation
Before you begin the installation process, there are a few key steps you should take to prepare for the project. First, gather all of the necessary tools and materials, including a measuring tape, level, drill, screws, and shims. Next, remove the old cabinets and thoroughly clean the area to ensure a smooth installation process. Finally, measure and mark the location of the new cabinets on the wall, taking into account any appliances or fixtures that will be installed.
Tools and Materials:
- Measuring tape
- Level
- Drill
- Screws
- Shims
Cabinet Assembly
Once you have prepared the space, it is time to assemble your new Shenandoah cabinets. Start by laying out all of the pieces and ensuring that you have all of the necessary parts. Then, follow the manufacturer’s instructions to assemble the cabinets, making sure to use the included hardware and fasteners.
Benefits of Shenandoah Cabinets:
- Wide variety of styles and finishes
- Durable construction materials
- Easy to assemble
- Long-lasting performance
Cabinet Installation
After assembling the cabinets, it is time to install them. Begin by installing the upper cabinets first, starting in the corner and working your way outward. Make sure to use shims to ensure that the cabinets are level and plumb. Then, install the base cabinets, making sure to leave enough space for appliances and fixtures.
Shenandoah Cabinets Vs Competitors:
| Feature | Shenandoah Cabinets | Competitors |
|---|---|---|
| Styles and finishes | Wide variety | Limited options |
| Construction materials | Durable and high-quality | Less durable |
| Installation process | Easy to assemble and install | Complicated installation process |
Finishing Touches
Once the cabinets are installed, it is time to add the finishing touches to your stunning new kitchen. Install any appliances or fixtures, such as a sink or range hood, and then attach the cabinet doors and hardware. Finally, add any desired accessories, such as under-cabinet lighting or a backsplash, to complete the look.
Additional Tips:
- Use a level to ensure that the cabinets are straight
- Leave enough space for appliances and fixtures
- Double-check all measurements before cutting or drilling
- Take your time and be patient
In conclusion, installing Shenandoah cabinets is a great way to upgrade your kitchen and add value to your home. By following these step-by-step instructions and taking the time to properly prepare and assemble your cabinets, you can create a stunning and functional kitchen that you will enjoy for years to come.
Frequently Asked Questions
What tools do I need to install Shenandoah cabinets?
Before starting the installation process, make sure you have all the necessary tools. You will need a drill, a level, a tape measure, a stud finder, a saw, a hammer, and a screwdriver. It’s also important to have safety gear such as gloves and goggles to protect yourself during the installation process.
If you don’t have these tools on hand, you can purchase or rent them from a hardware store or home improvement center. It’s important to have the right tools to ensure a smooth and successful installation.
How do I prepare my kitchen for Shenandoah cabinet installation?
Before installing your Shenandoah cabinets, it’s important to prepare your kitchen for the process. Start by removing all of the old cabinets and appliances from the area. This will give you a clean slate to work with and make it easier to install your new cabinets.
Next, make sure that the walls are clean and free of any debris or dust. Use a level to ensure that the walls are straight and even. You may also need to make some adjustments to the electrical and plumbing in your kitchen to accommodate your new cabinets.
What is the process for installing Shenandoah cabinets?
The installation process for Shenandoah cabinets is relatively straightforward. Start by assembling the cabinets according to the manufacturer’s instructions. Then, use a stud finder to locate the studs in your walls and mark them with a pencil.
Next, hang the cabinets on the wall using screws and brackets. Use a level to ensure that the cabinets are straight and even. Finally, install the cabinet doors and hardware, and make any necessary adjustments to ensure a perfect fit.
Can I install Shenandoah cabinets myself, or should I hire a professional?
While it is possible to install Shenandoah cabinets yourself, it’s important to have some experience with home improvement projects and a good understanding of the installation process. If you’re not confident in your ability, or if you don’t have the necessary tools and equipment, it’s best to hire a professional to handle the installation.
A professional installer will have the knowledge and expertise to ensure that your cabinets are installed correctly and safely, and they can also help you avoid any potential problems or mistakes that could lead to damage or costly repairs down the line.
What should I do if I encounter problems during the installation process?
If you encounter problems during the installation process, it’s important to address them as soon as possible. Start by reviewing the manufacturer’s instructions and troubleshooting guides to see if you can identify the issue.
If you’re still having trouble, reach out to the manufacturer or a professional installer for assistance. They may be able to offer guidance or advice to help you resolve the issue and ensure a successful installation.

Installing Lowes Shenandoah Cabinets ||DIY Kitchen Renovation||
In conclusion, the Shenandoah Cabinets Installation Guide offers homeowners step-by-step instructions to achieve a stunning kitchen. With its user-friendly guide, anyone can follow the instructions and achieve a professional-looking installation. The cabinets are durable, stylish, and will add value to any home.
With Shenandoah Cabinets, homeowners can elevate their kitchen space with quality products that are designed to last. The installation guide simplifies the process for anyone to follow, regardless of experience. Plus, the cabinets are customizable to fit any design preference, making them the perfect addition to any home renovation project.
Overall, the Shenandoah Cabinets Installation Guide provides homeowners with all the necessary tools to create a beautiful and functional kitchen. With its easy-to-follow instructions and high-quality products, homeowners can achieve a stylish and durable kitchen that will impress family and guests for years to come.