When Installing Kitchen Cabinets?
Are you planning a kitchen renovation and wondering about the process of installing cabinets? Installing kitchen cabinets is not only a crucial step in any kitchen renovation but can also be a daunting task for homeowners. However, with the right tools, techniques, and guidance, installing kitchen cabinets can be an exciting project that can transform your kitchen into a functional and stylish space. In this article, we will guide you through the process of installing kitchen cabinets and provide you with tips and tricks to make the process smoother. So, let’s dive in!

When Installing Kitchen Cabinets: A Comprehensive Guide
Installing kitchen cabinets is a significant undertaking that requires careful planning and execution. Whether you are remodeling your kitchen or building a new one, the installation process can be overwhelming. However, with proper planning and professional guidance, the process can be seamless and successful. In this article, we will explore everything you need to know when installing kitchen cabinets.
1. Planning Your Kitchen Cabinet Installation
Before the installation process, you need to plan appropriately. The planning process involves measuring the available space, choosing the right cabinet style, deciding on the cabinet layout, and determining the budget.
Measuring the space is crucial because it will help you determine the size and number of cabinets needed. You should also consider the kitchen design and style when choosing the cabinet style. The cabinet layout should be functional and efficient, enabling easy access to the cabinets. When determining the budget, consider the cost of the cabinets, installation, and any additional materials needed.
2. Preparing for Installation
Once you have planned the installation process, you need to prepare for installation. Preparation involves clearing the installation area, removing any old cabinets, and ensuring that the walls are clean and level.
Clearing the installation area will provide a clear workspace for the installation team. Removing the old cabinets will give room for the new cabinets and prevent any obstructions during the installation process. Ensuring that the walls are clean and level will provide a smooth installation surface.
3. Assembling the Cabinets
Before installing the cabinets, you need to assemble them. Assembling the cabinets involves following the manufacturer’s instructions, attaching the doors, and adding the shelves.
Following the manufacturer’s instructions will ensure that the cabinets are assembled correctly and provide a sturdy structure. Attaching the doors will provide the finishing touch to the cabinets, while adding shelves will provide additional storage space.
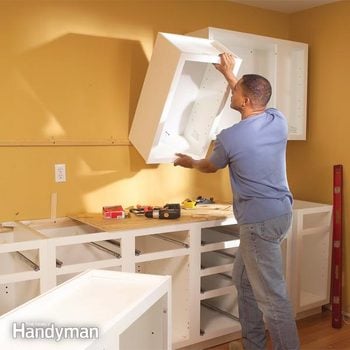
4. Installing the Upper Cabinets
After assembling the cabinets, you can begin the installation process. The first step is to install the upper cabinets. Installing the upper cabinets involves attaching a temporary support board, marking the cabinet’s position, and securing the cabinets to the wall.
Attaching the temporary support board will provide a level surface to attach the cabinets and prevent any damage to the wall. Marking the cabinet’s position will ensure that the cabinets are installed in the right position, while securing the cabinets to the wall will provide a sturdy structure.
5. Installing the Lower Cabinets
Once you have installed the upper cabinets, you can proceed to install the lower cabinets. Installing the lower cabinets involves attaching a temporary support board, marking the cabinet’s position, and securing the cabinets to the wall.
Attaching the temporary support board will provide a level surface to attach the cabinets and prevent any damage to the wall. Marking the cabinet’s position will ensure that the cabinets are installed in the right position, while securing the cabinets to the wall will provide a sturdy structure.
6. Installing the Countertops
After installing the cabinets, you can proceed to install the countertops. Installing the countertops involves measuring the countertops, cutting and fitting the countertops, and securing the countertops to the cabinets.
Measuring the countertops will ensure that the countertops fit perfectly, while cutting and fitting the countertops will provide a seamless finish. Securing the countertops to the cabinets will provide stability and prevent any movement.
7. Installing the Hardware
Once you have installed the cabinets and countertops, you can proceed to install the hardware. Installing the hardware involves attaching the handles and knobs to the cabinets.
Attaching the handles and knobs to the cabinets will provide a finishing touch to the cabinets and make them functional.
8. Cleaning Up
After completing the installation process, you need to clean up the installation area. Cleaning up involves removing any debris, wiping down the cabinets and countertops, and ensuring that the installation area is tidy.
Removing any debris will provide a safe workspace, while wiping down the cabinets and countertops will ensure that they are clean and free from any dust. Ensuring that the installation area is tidy will provide a neat and organized installation.
9. Benefits of Professional Installation
While it is possible to install kitchen cabinets yourself, professional installation has several benefits. Professional installation provides a seamless and efficient installation process, ensures that the cabinets are installed correctly, and provides a warranty for the installation.
Professional installation also provides access to professional tools and equipment, ensuring that the cabinets are installed safely and securely.
10. DIY vs. Professional Installation
When installing kitchen cabinets, you have the option of DIY or professional installation. DIY installation is cost-effective, provides a sense of accomplishment, and allows for customization.
Professional installation, on the other hand, provides a seamless and efficient installation process, ensures that the cabinets are installed correctly, and provides a warranty for the installation.
In conclusion, installing kitchen cabinets is a significant undertaking that requires careful planning and execution. With proper planning and professional guidance, the installation process can be seamless and successful. By following the steps outlined in this article, you can ensure a successful kitchen cabinet installation.
Frequently Asked Questions
What tools do I need when installing kitchen cabinets?
When installing kitchen cabinets, you will need a variety of tools to ensure that the job is done correctly. Some of the tools you will need include a drill, drill bits, measuring tape, level, screws, screwdriver, saw, and a hammer.
It is also important to have safety gear such as gloves and safety glasses. Before starting the installation process, make sure you have all the necessary tools and equipment ready.
How do I measure for kitchen cabinets?
Measuring for kitchen cabinets is an important step in the installation process. Start by measuring the height and width of the wall where the cabinets will be installed. Then, measure the height and width of the space where the cabinets will be placed.
When measuring, be sure to take into account any obstacles such as light switches, outlets, or pipes. Double-check your measurements to ensure accuracy before ordering or purchasing the cabinets.
What is the best way to install kitchen cabinets?
The best way to install kitchen cabinets is to follow the manufacturer’s instructions carefully. It is important to make sure that the cabinets are level and securely attached to the wall.
Before starting the installation process, make sure to have all the necessary tools and equipment ready. It is also recommended to have someone assist you during the installation process to ensure that the cabinets are properly aligned and installed.
What should I do if my kitchen walls are not level?
If your kitchen walls are not level, it can make the installation process more challenging. One solution is to shim the cabinets to make them level.
To shim the cabinets, place shims between the cabinets and the wall where necessary. Be sure to use shims that are made of sturdy material such as wood or plastic. It is also important to make sure that the cabinets are level before securing them to the wall.
How long does it take to install kitchen cabinets?
The time it takes to install kitchen cabinets can vary depending on the size of the kitchen and the complexity of the installation. On average, it can take anywhere from one to three days to install kitchen cabinets.
Factors that can affect the installation time include the number of cabinets being installed, the level of customization required, and any unforeseen issues that may arise during the installation process. It is important to plan accordingly and allow enough time for the installation process.
In conclusion, installing kitchen cabinets requires careful planning, precision measurements, and attention to detail. By following these steps, you can ensure that your cabinets are properly installed, level, and secure. Remember to take the time to prep your space, gather the necessary tools and materials, and work with a partner if possible.
Additionally, it’s important to consider the type of cabinets you’re installing and their specific installation instructions. Some cabinets may require additional steps or hardware, and it’s crucial to follow these guidelines to avoid any potential issues down the line.
Finally, don’t be afraid to ask for help or consult with a professional if you’re unsure about any aspect of the installation process. With the right approach, you can achieve a beautiful, functional kitchen that will serve you and your family for years to come.